
Review
There are really three basic settings that you want to look at when getting ready to take a photo: shutter speed, aperture and ISO.Shutter speed is pretty obvious - it's how long the shutter stays open after you press the shutter release button. It's expressed in fractions of a second (usually) like 1/200s. Most cameras can go faster than 1/1000s and you might need that for very fast trains.
Aperture is the diameter of the interior of the lens while taking the photo. Think of it as the size of the lens' window to the world. It determines two things: how much light comes through to the camera, and how much of the scene is in focus (depth of field). Aperture is expressed as a fraction of focal length, like f/4 or f/5.6 (or F4 or F5.6). For example, if you have a lens that zooms from 18-200mm, if you are have it zoomed to 200mm and are using an aperture of f/5.6, the aperture is 35.7mm wide. Don't worry too much about that math. What you need to know is that low F numbers mean more light, but less depth of field. High F numbers like f/18 mean less light but more depth of field. Also keep in mind that most zoom lenses do not have the same aperture at all zooms (more expensive lenses like my Canon 70-200mm lens
ISO in film days was a measure of how light sensitive the film was. Now it is a measure of how much the signal is amplified at the sensor. Higher ISO settings are useful in low light situations. Generally higher ISO means more "noise" (dots) in your photo, so there is a trade-off between light sensitivity and image quality. Modern cameras are getting much better at high ISO but my Canon T1i is noticeably noisy at ISO 800 or higher and I really try to avoid going above ISO 400. Your mileage may vary.
Exposure Triangle
Remember that these three camera settings are all related: shutter speed, aperture and ISO. For a constant exposure, change one and you will affect one or both of the other two. For example, if you are taking a photo on a cloudy day with your camera in automatic mode, it might decide to use a shutter speed of 1/60s, an aperture of f/5.6 and ISO 200. You could manually override this with 1/30s, f/5.6 and ISO 100 and it would be the same exposure/brightness. On sunny days this makes little difference but when the light is low, you have to make sacrifices and you should decide what to do, or your camera will decide for you and you might not like the result.A Confession

With that out of the way, here are some recommended settings for photographing moving trains. Please keep in mind that these are starting points and you should adjust based on conditions.

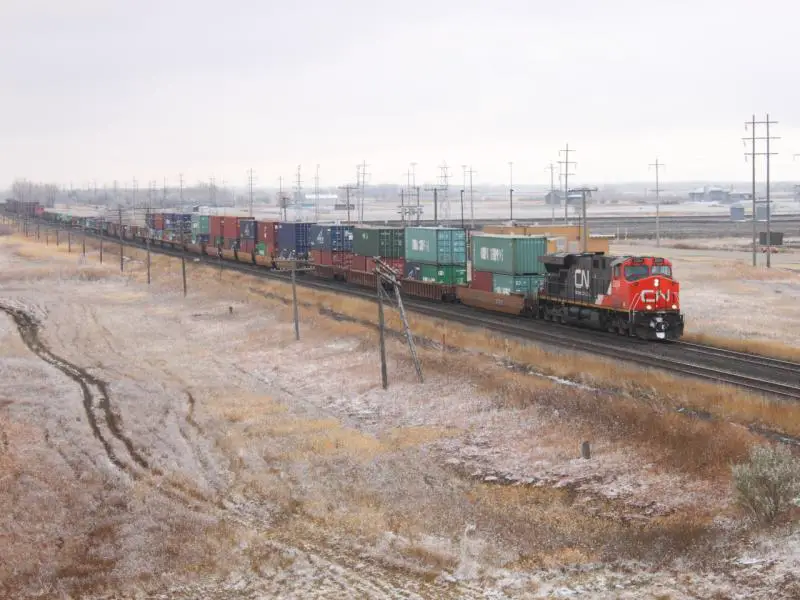
Full Daylight, Sun Behind You
Shutter speed: 1/800s or faster - freeze the actionAperture: f/8 or higher - good depth of field
ISO: 100
This is the ideal. There's lots of light so you don't have to make any compromises. Shooting in full auto mode will likely work well as long as your shutter speed is fast enough. It's hard not to take a good photo in this light!
Daylight, Backlit
Shutter speed: 1/400s or faster - freeze the actionAperture: f/8 or higher - good depth of field
ISO: 100
Exposure Compensation: -2/3 to -1 f-stop - make the image darker
When you find yourself on the "wrong" side of the subject... what do you do? Treat it like a normal daylight shot, but use your camera's exposure compensation to tell it to darken the image. Why? Your camera evaluates the scene and decides on a "proper" exposure. If there is a large area of shadow in the frame, it will likely overexpose the bright areas and "blow them out", so they will appear as pure white with no detail. Your camera may show this after you take a shot by blinking areas on the photo that are blown out. You use exposure compensation to override the camera's decision. It may mean that the black area will lose detail, but you sacrifice that to avoid a white sky.
Tip: Shoot RAW if you can, to preserve more detail in those shadow areas!
Here's a real world example from yesterday. I saw a CP spreader and plow in the yard in Kamloops, BC. I could only shoot from this angle because of the fence and some trees off-screen to my right. I used a shutter speed of 1/125s (because it wasn't moving, no need for higher speeds), exposure compensation of -1 stop to avoid blowing out the sky in the top left, and the camera chose an aperture of f/4.5 (best that the lens was capable of) and ISO 200. Some aggressive editing in Adobe Lightroom changed the left image (out of camera) to the right (finished product). Even with -1 stop of compensation, a tiny part of this image is still blown-out. Can you spot it?

More info: How to Fix Backlit Photos in Lightroom
Cloudy / Overcast / Rainy
Aperture: f/4 or f/5.6 or higher - as low as your lens permits
ISO: 400
Exposure Compensation: Possibly required - see above
Cloudy days. Bleah. You don't have enough light, there's not a lot of contrast, so why bother? I say, get out there and shoot. You'd be surprised at what you can find. Many of my photos that I really like feature interesting cloud formations or foul weather.
The challenge is that there isn't a lot of light, so you have to compromise on a lot of things. The settings above sacrifice depth of field and a bit of image quality to try to keep the shutter speed at a reasonable level.
You may have to use exposure compensation if you're shooting toward a bright area of sky. See the "Daylight, backlit" section above.
Tip: photos taken on a cloudy day tend to look "flat" because they lack contrast. Don't be afraid to crank the Contrast slider when editing your cloudy day photos.
Sunrise / Sunset
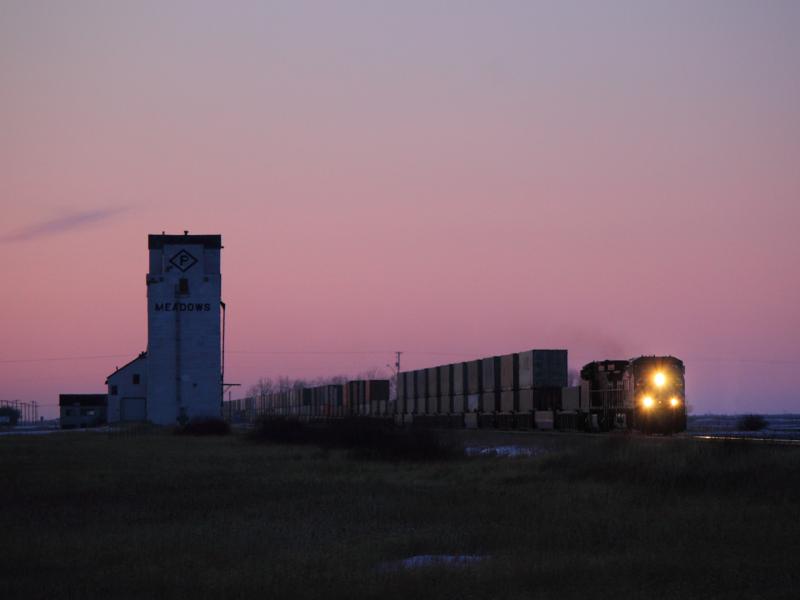
Aperture: f/4 or f/5.6 - as low as your lens permits
ISO: 400
Exposure Compensation: Possibly required - see above
These are the magic hours - get out there and shoot! The light is beautiful, often there are great colours in the sky, it's a great time to photograph. However... accept that the train is going to be dark, like the photo of CEFX 1050 at Meadows above. There's not much you can do to keep a moving train lit while keeping it in focus. You might consider a low shutter speed (1/30s or slower) and a tripod, and accept that the train will be blurred. Think outside the box. Try a pan!
Night / Low Light
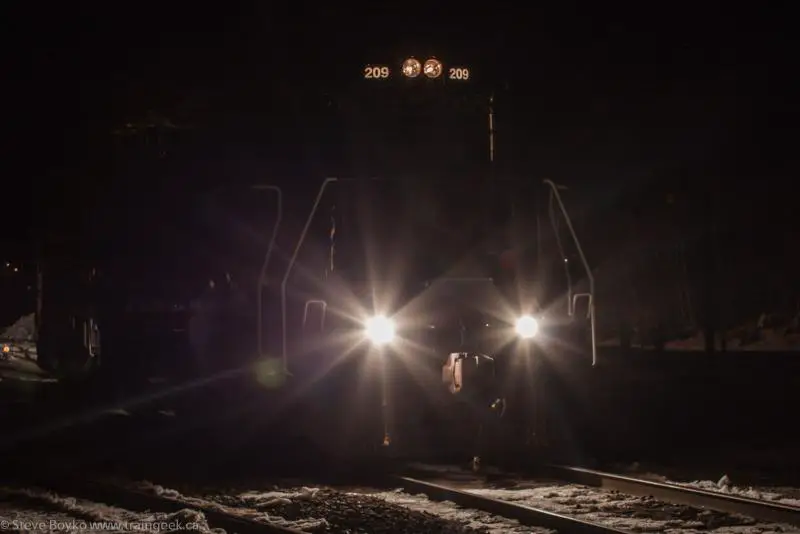
Aperture: f/4 or f/5.6 - as low as your lens permits
ISO: 400
For really low light or night photos, you're going to have very slow shutter speeds. You'll need to have a tripod or rest your camera on something to avoid jitter. Moving trains will be a blur at best. Maybe you can get a nice light trail from the train headlights and/or crossing gates? If you're lucky, you can catch a shunting engine when it stops, like I did in McAdam for the photo above.
For really low light or night photos, you're going to have very slow shutter speeds. You'll need to have a tripod or rest your camera on something to avoid jitter. Moving trains will be a blur at best. Maybe you can get a nice light trail from the train headlights and/or crossing gates? If you're lucky, you can catch a shunting engine when it stops, like I did in McAdam for the photo above.
Bonus: Snow

An Exercise For You
I hope these guidelines prove useful for you. I have an exercise for you. Set your camera to shutter priority and try photographing something non-moving at 1/60s while holding your camera and not bracing it against anything. Then 1/50s. Go down to 1/25s. You're doing this to find out how low you can comfortably shoot so you know your limits. I have steady hands so generally I can shoot 1/25s hand-held at 18mm zoom. Keep in mind that as you zoom out you need a faster shutter speed.Further Reading
- How to Fix Backlit Photos in Lightroom
- 5 Quick Tips to Improve Your Railfan Photosgraphy
- Editing a Night Photo in Lightroom
- 5 Reasons Why You Need Adobe Lightroom
- Books on Amazon about camera settings
9 comments:
Thanks Steve,
I need to practice changing the setting. I usually run in shutter priority and I know it limits me. I'm going to try to expand my horizons and your tips will definitely help.
Maybe you could tell us more about which lenses you use in different applications some time.
Karl
I'm glad you liked this, Karl.
Lenses... yes.. good idea!
Great post.
I'll definitely re-use some of your settings. :)
DaveM
Thanks, DaveM! I'm glad you found it useful.
Thank you for this vary informative guide! I have saved this page as a help guide for when I find mystery in tricky situations. I just bought my first dslr camera.
Hi Steve,
Even though I'm an old hand at photography it's always good to hone up on certain elements. Living in the Yorkshire Dales I do mainly Landscape, apart from the odd Ribblehead train. This weekend there is quite a historic event taking place in York, 4 generations of trains travelling side by side into York station, one of these trains is The Flying Scotsman.
Your info' is most welcome and has given me that extra confidence to have a go at this once in a lifetime opportunity.
Regards,
Tom K
Hi Tom, sounds like a great event to see! Good luck and have fun.
Great post, thanks for sharing.
Thank you for the post.
Question! I photographed a moving train from the overpass and the headlamp of the train appeared to be 5 feet ahead of the train! Is there a setting that allows me to avoid this mishap?
Thank you, and keep the good info coming!
Allen A
Post a Comment