Showing posts with label lightroom. Show all posts

Saturday, November 19, 2016

How to Fix Backlit Photos in Lightroom

Backlit photo - before and after
Here's a common problem. You see an interesting subject but the light is behind the subject. This is called "backlit" for obvious reasons.

Maybe you can't move to a spot with better light, or the subject is a train that's moving and you have to get the shot now. You take the photo anyway and you end up with something like this:

Can we make this better?

To quote Bob the Builder, "Yes We Can!"

The quick version of what we're going to do in Adobe Lightroom is:

  • Boost shadows
  • Reduce highlights
  • Increase saturation
  • Deal with noise 

Let's get to it.

What Does "Backlit" Mean?

Let's define what "backlit" means. It's defined as "illuminated from behind" meaning that the light source is farther away from the photographer than the subject is, and the light source is in the same direction as the subject.

It could mean that the light is directly "in line" with the subject, silhouetting the subject; or it might not be in line and simply causes deep shadows like the photo above.

Why is Backlighting Bad?

First off, it isn't always bad. In portrait photography you often want backlighting - often combined with a little flash.

However, in landscape or railfan photography, backlighting is usually undesired. Why?

The main reason why backlighting is bad are the deep shadows it causes, which obscure details. A secondary problem is the sky, which is often too bright or pure white from the camera trying to expose for the subject and "blowing out" the sky.

How To Fix Backlighting in Lightroom

In Adobe Lightroom, there are two main things you can do to fix backlit photos - boost the shadows and reduce the highlights.

If you use other editing programs, the process is likely similar, but I'll go through the process with Lightroom.

The basic steps are the following:

  1. Boost Shadows by about +50
  2. Reduce Highlights by about -90
  3. Increase saturation
  4. Deal with noise
  5. Make final adjustments


Boosting Shadows

In Lightroom, open the image in the Develop module and go to the Basic panel. Try boosting the Shadows to +50 and see how it looks.
Backlit - boosting the shadows
This definitely brings out some detail on the "dark side" of the locomotive, without significantly affecting the brightness of the rest of the photo. Note that the grass in the foreground is a bit brighter too.

Boosting the shadows is a lot easier if you shoot in RAW format with your camera, if you can. RAW format files have a lot more information in them than a JPG file does.

Now we reduce the highlights.

Reducing Highlights

In Lightroom, take the Highlights slider in the Basic panel and slide it down to about -90.
Backlit - reducing the highlights
What we're doing here is reducing the brightness of the sky. As I mentioned above, the sky is often too bright in backlit photos so bringing the highlights down usually reduces the sky's brightness.

If the sky was totally blown out (pure white) then this won't do a lot but it will help. For blown-out skies, you may need to add a graduated filter in Lightroom and reduce the brightness of the sky further. You may also have to reduce the saturation in that filter because totally blown out skies often have an unwanted colour cast to them.

Increasing Saturation

Backlit photos often look washed out, so they benefit from a little colour saturation.

In Lightroom you have two sliders that directly affect how much colour is in the photo: saturation and vibrance. They both affect the intensity of colour in the image but vibrance is a little more subtle than saturation is. This article explains the difference well. Think of vibrance as a gentle way to boost colour where it's needed while saturation is a colour fire hose. A little of the saturation slider goes a long way... but sometimes you have to go wild with it.
Backlit - adding saturation
Now I'm sure you're saying - "hold it, that looks terrible!" That grass looks totally unrealistic.

I agree. Let's fix it with a graduated filter. I dragged it up from just below the horizon to overlap the bottom of the locomotive and horizon a bit, then reduced the saturation in the filter to -40 to partially compensate for the saturation added above. I didn't fully compensate because I wanted a bit more colour in the grass than the original.
Backlit - fixing the grass with a graduated filter
So that looks pretty good. We're almost done.

Dealing With Noise

The problem with boosting shadows in images is that you also boost the digital noise. In film days we'd call this "grain" but with digital images it is noise. Basically, digital cameras record some information for dark areas but not a lot. If you increase the exposure in mostly black areas, this lack of information shows up as noise or pixelated, blocky details. Have a look at the image below, shown at 2:1 size.
Noise in boosted image
You can see how grainy it looks. Also, I haven't sharpened the image yet beyond the default of +25, so we have to do that... but sharpening can often make noise worse, so we have to balance the two.

One very important slider in Lightroom that deals with sharpening is the "Masking" slider. I never knew about this slider when I first started using Lightroom and I wish I had!

If you have the Masking slider at zero, basically you are applying sharpening to the entire image. Often you don't want or need to do that. In our working image we'd like to sharpen the edges of the locomotive and the details on it, but we don't want to sharpen the sky and we probably don't want to sharpen the grass very much. The Masking slider allows us to decide what parts of the image we should sharpen. I'll write more about that sometime but for now this article gives a good overview of sharpening in Lightroom.

Here's the same closeup after aggressively sharpening at 111 (masking 57) with luminance noise reduction of 44.
After sharpening and noise adjustment

Final Adjustments

A few final adjustments will finish the job. I decided the image could use these adjustments:

  • White balance adjustment - temp +350, tint +2 (I thought the original was a bit blue)
  • Brightness +0.36
  • Clarity +10
  • Post-Crop Vignetting -12

Here's the final image.
After final edits
I hope you'll agree this image is a lot better than the original. It won't win any awards but it is definitely an improvement.

Final Comments

This might seem like a lot of work, but one of the great things about Adobe Lightroom is that you can put these into a preset and apply them - bang - all in one shot. I've developed a "backlit" preset to do all this in a few seconds, and then I do whatever minor tweaks I feel are necessary to finish the photo. This takes editing time down from 10 minutes to 1 minute. I hope to package these presets up soon and offer them as a download, but for now you can make your own preset with the settings below, or experiment with other presets like the 101 Lightroom Presets Pack from Digital Photography School.

These are the edits I made to this image:

  • Shadows +50
  • Highlights -90
  • Saturation +71
  • Graduated filter with exposure -40
  • Edge masking 68
  • Sharpening 111
  • Luminance Smoothing 44
  • Exposure +0.36
  • Clarity +10
  • Post-Crop Vignette -12
  • White Balance adjustment

Thanks for reading along!

Further Reading


Disclosure: This post contains one or more links that are affiliate links, for which I may earn a commission if you follow the link and purchase something from the site that they link to.

Tuesday, April 21, 2015

First Impressions of Lightroom 6's Face Recognition

I just upgraded to Adobe Lightroom 6 this evening, and here are my very preliminary impressions. I've been looking forward to LR6 for its rumoured facial recognition features.

I subscribed to Adobe Creative Cloud (Photography) a few days ago in anticipation of the LR6 release. Once I found out that it was out, it was a simple matter of going to the Creative Cloud app in the notification area, selecting Apps, and clicking "Install" by Lightroom CC (2015).

The download took about 10 minutes, and then it installed Lightroom 6. As in previous versions it does not replace the older version of Lightroom - it installs another copy of Lightroom. Here's my Control Panel.
Notice that LR6 takes 1.42 gigabytes, an additional 350 megabytes more than LR5.7.0.

When it first ran, it asked me to upgrade my catalog. The Lightroom catalog is where all of the edits, tags, star ratings, and so forth are stored. Since Lightroom doesn't actually change your image files, all of the editing you do is stored in the catalog. It's the heart of the system, and of course it needs to upgrade it when you do any upgrades to Lightroom. Since I had a good backup, I agreed and in a minute or two I was in Lightroom 6.

The interface looks exactly the same to me in Library mode... except for one subtle icon at the bottom.

I didn't notice that at first. I poked around a bit and found a photo with a person in it. There's a new little icon at the bottom that you can use to tag a face.

Click on it. Lightroom will try to put boxes around faces in the photo. If it doesn't identify one, you can drag a rectangle around the face. Lightroom will make a guess as to who it is, or if you're just starting out, it'll be blank.

You can confirm it by clicking on the checkmark when you hover over it.

Of course, the easier way is to click that little photo icon I mentioned earlier.

When I clicked that, I was presented with a "Welcome to People View" dialog and a choice between two options: "Start Finding Faces in Entire Catalog" and "Only Find Faces As-Needed". Telling it to start right away will slow down your computer, but I said, what the heck, let's go.

As it churned away, it presented a list of people and its best guesses as to who they are.

You can see that it puts a name and question mark beside those it has tentatively identified. If you hover over the name a checkmark appears and you can click that to confirm Lightroom's guess.

Eventually you will run out of guesses and end up with just unknown people.
The number in the top left appears to be the number of similar photos. You can click in the gray area and type the name. Lightroom will suggest names as you type.

TIP: You can shift-select a number of photos and just enter a name once.

Occasionally Lightroom will mis-identify what it thinks is a face. You can remove that.

I'm still learning... there's lots left to explore.

By the way, Adobe has a nice video about face recognition in Lightroom 6.

Keep experimenting!

Sunday, November 23, 2014

Editing a Night Photo in Lightroom


In this post I am going to step you through how I edited a photo I took last night to arrive at the photo above. As I mentioned before, I use Adobe Lightroom 5 (affiliate link). By no means is this the only way to edit a night photo, nor is this the "right" order to process images. Try your own way! OK, here we go.

I took this photo last night at Waverley Street in Winnipeg. It was a little after 7 PM and definitely dark outside, although there was a lot of ambient light from city lights and a nearby billboard.  These are the camera settings I used to take the photo:
Note that I locked the ISO to 400. If I had left it at AUTO my camera would have used ISO 1600 and the noise would have been terrible. I always override the ISO at night or low light, and with my T1i I find the noise is too much at ISO 800+ so I keep it at 400. I chose 1/80s for the shutter speed to strike a balance between sharpness and light. I probably could have gone down to 1/30s as I do have steady hands.

Here's how it looked in Lightroom when I first imported the RAW file. I always shoot in RAW format rather than JPG format as there is a lot more detail in a RAW file, which is especially important in night photography.

Here's a couple of things to note about the interface. On the left there is a section called "History" where Lightroom documents every change you make to the image. This is one great benefit of Lightroom - changes are non-destructive and you can always go back. On the right are the various sliders and controls used to edit the image. So far all I've done is import it.

First, we apply the lens profile.

It didn't do much - you'll see the corners are a bit brighter and it corrected for lens distortion a bit. I was using my Canon 50mm f/1.8 lens as that is the most light-sensitive lens I have. The f/1.8 indicates the aperture will open up as much as 50/1.8=27.78 mm. If it was, say, f/4 then the lens would open up only to 12.5 mm in diameter, which means a lot less light would come in to the sensor. Low f numbers are better for low light and night photography.

I always apply the lens profile and you should too. You'll really see a difference when using a wide angle lens, especially a cheap kit lens like my 18-55mm lens, because there is a lot of distortion when shooting at 18mm. The horizon lines are not straight until you apply the profile!

Anyway, the next step is to adjust the exposure.

I brought it up quite a bit to get it reasonably bright. You can't keep cranking the exposure because the noise of the photo really starts to show. Click on any image to view them larger to really see the noise.

You might notice that the colours are a little "off". A very important step is to apply the right white balance.

Here I clicked on that eye-dropper highlighted at right and clicked on the white stripe on the engine just to the right of the number. You're telling Lightroom "this is white" and then Lightroom will adjust the rest of the image. At night your camera has a really hard time determining what "white" is so the white balance is often wrong. You'll see this with winter scenes too because the expanse of snow fools the sensor and you end up with very dull, gray photos until you adjust the white balance. This is not something new with digital cameras - your camera processor (or you in the darkroom) would adjust the development based on the ambient lighting.

Now it's time to crop and straighten. Here I am in the middle of leveling the image.

In the next screen capture, you'll see I cropped out the truck and post and fiddled with it for a while to get it level.

Next I worked on the shadows.

This was a subtle edit. You'll see a bit more detail in the trucks and underside of the locomotive.

Next I adjusted the vibrance.

In Lightroom you have two options to change the intensity of colour in the photo, vibrance and saturation. I almost always use vibrance. The difference is that saturation adjusts all of the colours while vibrance tries to preserve skin tones. I find that boosting the vibrance makes a photo more vivid without looking unrealistic.

Now we have to deal with the noise. Here I opened the Detail pane and you can see how much grain / noise is present in the image.

The luminance slider is what I use for noise reduction. I fiddled with a couple of settings, as you'll see.

That's the finished image. You can crank the noise reduction higher but what you'll find is that it looks too plastic and you lose a lot of detail. If you ever see selfies where the person looks very plastic, that's too much "skin smoothing" which is basically the same thing, averaging pixels to try to remove dots and imperfections.

I hope you enjoyed this little romp through my photo editing workflow!

Thursday, October 09, 2014

5 Reasons Why You Need Lightroom

I'm going to give you five reasons why you need Adobe Lightroom to manage your photos.

First, a brief paragraph about what Adobe Lightroom is. According to Wikipedia, "Adobe Photoshop Lightroom is a photo editing and management computer program... designed to assist users in managing large quantities of digital images and doing post-production work." You'll see how it can help you.

1. Organize Your Photo Collection!
I have a system for organizing my photos. Train photos go into a folder structure organized by railway - BNSF, CEMR, CN, CP, and so forth. If it's not a specific railway, it goes under General Railroad and into a subfolder by location. Each photo is named like this: "engine# location yyyymmdd photographer". I put my initials on the end of my photos.

This worked well enough and I still do that. In Lightroom, though, you can tag photos with keywords to really help you organize them better. It's up to you how far you want to go with this but I generally tag photos with two or three keywords. An example:
Lightroom offers suggestions for keywords, apparently based on keywords used in other photos taken around the same time. You can see at the bottom that you can have user-defined keyword sets as well, so you might have an "engine set" with keywords like SD40, SD60, GP38 and so forth.

In the photo above, you can see my naming scheme at the top left and all the other "metadata" that Lightroom has... which leads me to...

2. Find Your Photos

Now that I'm using Lightroom, it's so much easier and faster to find photos. Let me give you an example.

I stumbled across a photo of Napadogan, New Brunswick online and shared it on the RailsNB Facebook group. A discussion started and I wanted to share a few more photos of when I visited Napadogan back in 2007. It was easy to go to Lightroom and search for that.
Two seconds later, I had a list complete with thumbnails.


It's important to realize that all of the metadata is searchable. Some of the photos above were picked up because they were tagged with Napadogan, some because they had Napadogan in the file name, and some because they were in a folder called "Napadogan Sub". If you want, you can limit what metadata it searches. You can also search by date, by camera type, by rating and a number of other criteria in various combinations.

3. Kickass Photo Editing
Adobe Lightroom has great photo editing built in. The Develop mode takes you to a very powerful, integrated photo editor. It's not quite Photoshop, but you can do a lot with the Develop mode. For example, I took this photo:

and tweaked it in Lightroom to this:

just using the Develop module. Lightroom 5 added the "healing brush", long a favourite of Photoshop users. It's handy to fix little problems in the photo or remove things like power lines.

I'm still learning things in the Develop module. My new favourites are the graduated filter and the radial filter, both of which I used in the edit above. Lightroom keeps a history of all your edits (see left column of photo below) and you can roll back to any previous edit at any time. It does not modify the original photo file at all.

4. Publishing Made Easy!
Once you've edited your photo, Lightroom makes it easy to publish your photo.

You can right-click on any photo and export it to a file. The power comes from building presets to publish it just the way you like. For example, I have a preset called Export to Web that does the following:

  • Places the exported file in a known folder
  • Sets JPEG image quality to 68
  • Resizes it so the longest edge is 1600 pixels
  • Sharpens it for screen viewing
  • Adds my watermark to the bottom left corner


Lightroom also has Publish Services. These are for specific web sites such as Flickr, 500px, Facebook and so forth. You can just drag your photo(s) onto one of the services, and when you're ready, right-click and select Publish and Lightroom will take care of publishing your photo(s) there.

5. Mobile Editing
The latest version of Lightroom allows you to rate and edit your photos on your iPad or iPhone (sorry, Android not available.. yet) via Lightroom Mobile. This is a powerful extension of Lightroom so you can take it with you and work on your photos offline. It requires Lightroom CC (see below).

Another way to edit your Lightroom photos is via the Mosaic plugin for Lightroom. It is similar to Lightroom Mobile but does not allow editing the photo itself. However, it works with the regular Lightroom.

I'm Sold! How To Buy
Lightroom is sold in two flavours... Lightroom and Lightroom Creative Cloud (CC). The original Lightroom is like most software - you purchase it once and it's yours forever, at least until the next major revision comes out. Lightroom CC is a subscription service and you pay monthly forever to use the software.

There are pros and cons to both. Buying Lightroom outright is $149 US and you own it forever with no more charges. However, when Lightroom 6 comes out, you have to buy that again; there's no free upgrade between major versions.

Lightroom CC allows you to have the latest version, always, and also enables Lightroom Mobile as discussed above. You can sign up for Creative Cloud / Photography which gives you Lightroom and PhotoShop for $9.99 US/month.

I've purchased Lightroom but I am strongly considering switching to Lightroom CC when version 6 of Lightroom comes out. I really want to start mobile editing!

I hope this helps you decide whether you want to buy Lightroom. Personally I am a huge fan of Lightroom and I think it is the #1 photography tool for me.

DISCLAIMER: If you follow the Lightroom links to Amazon and purchase the software there, I get a small percentage of the sale. If you'd prefer not to, you can go directly to Adobe or purchase via your favourite retailer.

Sunday, February 17, 2013

A Lightroom Editing Example

I have been using Adobe Photoshop Lightroom 4 to manage my photos for several months now. It is fantastic and I can't say enough good things about it. What I would like to do today is show you how I edited a photo to produce this:
CN 2553 in Winnipeg 2013/02/13

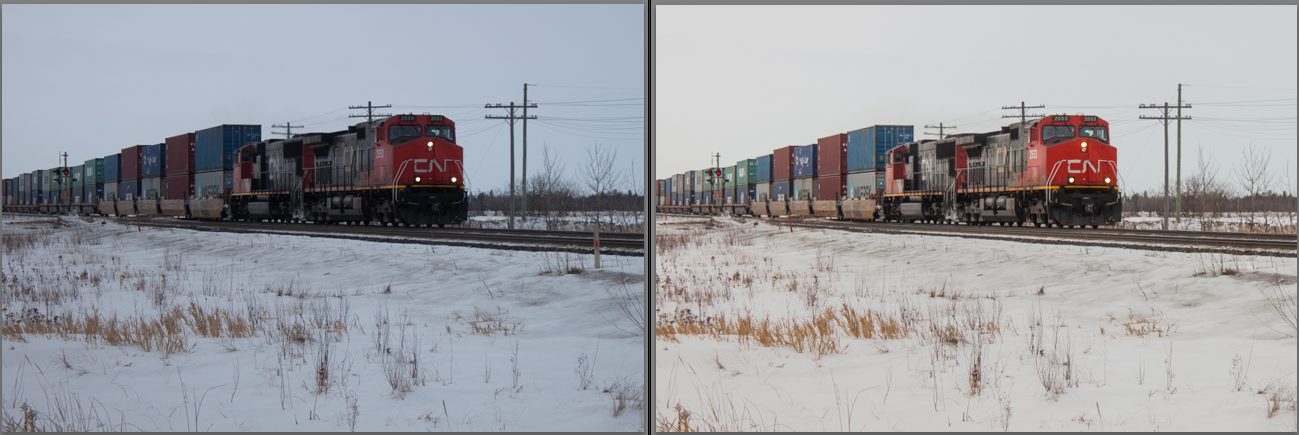
Here's the before and after photos:
CN 2553 Lightroom Editing Example

One of the many great things about Adobe Lightroom is that it lists every edit you have done to a photo. Here's what I did to this photo.
  1. Crop and straighten. Pretty basic and this should be done on almost every photo.
  2. Enable lens profile. This allows Lightroom to compensate for a particular lens, in this case my Canon 18-55mm lens. Generally it compensates for pincushioning on wide angle shots, etc.
  3. Adjust white balance. You can see the "before" photo is bluish, very common for overcast photos with a lot of snow. You have to tell your camera or editing program what is "white", easy enough when there is a lot of snow!
  4. Shadows. Lightroom has a handy slider to lighten or darken shadows, so I cranked it up to +52 to brighten up the underside of the engines.
  5. Contrast and Exposure. I increased both by about 17.
  6. Luminance Smoothing. The original was a bit grainy, even though it was shot at ISO 100. The smoothing can get rid of some grain but you have to be cautious not to use too much or you lose all detail. Luminance smoothing is also handy in portrait photos to get rid of some blemishes, wrinkles, and so forth.
  7. Clarity. I just love this slider in Lightroom to bring out detail. I was fairly conservative and only used +17 as too much Clarity in snow makes everything look harsh.
  8. Saturation and Vibrance. I cranked both of this up some to make the colours of the engine and containers "pop".
  9. Spot Removal. I used the spot removal in Lightroom to get rid of the fibre optic warning post in the right of the frame.
It took about 10 minutes but I think these edits dramatically improved a dull photo. What do you think?